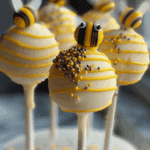
Bee Cake Pops: 7 Tips to Create Adorable Treats
Whimsical, bite-sized cake pops decorated like bees, combining a soft cake center with a smooth candy coating, edible eyes, and sprinkles. Perfect for birthdays, baby showers, or spring-themed events.
- Prep Time: 30 minutes
- Cook Time: 30 minutes
- Total Time: 2 hours
- Yield: 24 cake pops
- Category: Dessert / Snack
- Method: Baking & Dipping
- Cuisine: American / Party Treat
- Diet: Vegetarian
Ingredients
1 box of cake mix
3 eggs
1/2 cup vegetable oil
1 cup water
1 cup yellow candy melts
2 tablespoons black food coloring
1 package lollipop sticks
Edible eyes
Yellow sprinkles
Instructions
- Prepare the cake mix according to package instructions using eggs, oil, and water.
- Bake the cake and let it cool completely.
- Crumble the cooled cake into fine crumbs in a large bowl.
- Add frosting to the crumbs and mix until it forms moldable dough.
- Form the mixture into small balls and place on a lined baking sheet.
- Chill the balls in the refrigerator for at least 1 hour.
- Melt the yellow candy melts according to package instructions.
- Dip the tip of each lollipop stick into melted candy, then insert halfway into a cake ball.
- Dip each cake pop fully into the candy melts, tapping off excess coating.
- Use black food coloring to paint bee stripes while coating is still wet.
- Add edible eyes and yellow sprinkles for decoration.
- Place cake pops upright in a foam block or holder and let harden completely.
Notes
Flavor Swap: Use chocolate, red velvet, or lemon cake mix for variety.
Color Change: Use different colored candy melts for themed events.
Filling Twist: Add jam or Nutella in the center of each cake ball.
Decor Style: Use fondant wings or draw faces for extra character.
Mini Pops: Make smaller pops for party platters.
No-Stick Option: Serve as truffle-style cake balls without sticks.
Store in an airtight container at room temperature up to 3 days or refrigerated for 1 week. Avoid humid areas.
Nutrition
- Serving Size: 1 cake pop
- Calories: 180
- Sugar: 18g
- Sodium: 120mg
- Fat: 9g
- Saturated Fat: 5g
- Unsaturated Fat: 3g
- Trans Fat: 0g
- Carbohydrates: 22g
- Fiber: 0.5g
- Protein: 2g
- Cholesterol: 25mg
Find it online: https://chocolatecoveredamy.com/bee-cake-pops/

