Why You’ll Love This Recipe
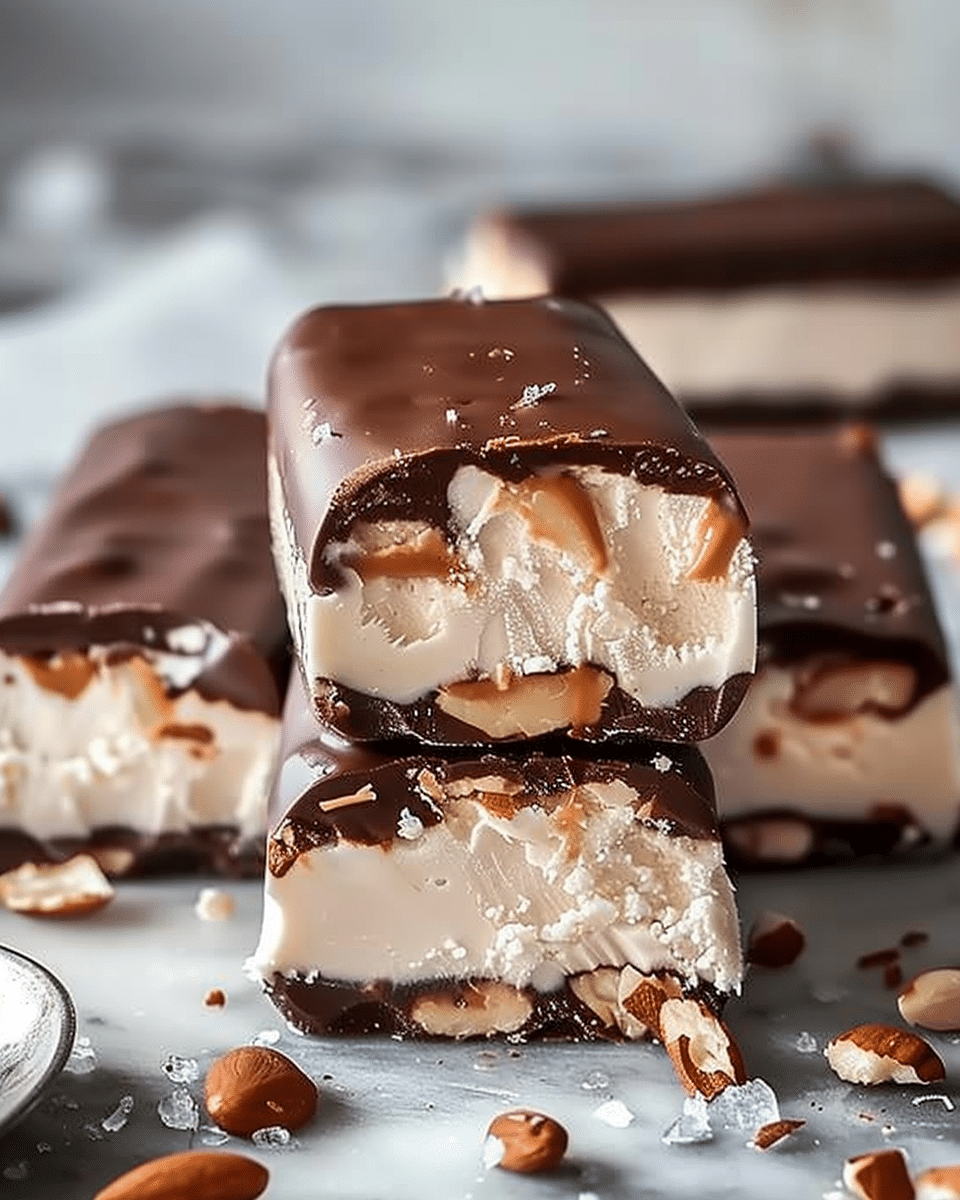
These Snickers Ice Cream Bars are a homemade version of a classic candy bar, with a creamy coconut milk-based peanut butter ice cream, a smooth peanut butter caramel layer, crunchy roasted peanuts, and a rich chocolate coating. They’re not only delicious, but they’re also customizable with your choice of sweeteners, making them perfect for people with dietary preferences or restrictions (like being dairy-free and gluten-free). They’re perfect for a summer treat, a party, or just a fun snack to enjoy with the family!
Ingredients
For the Ice Cream Base:
- 200 g full-fat canned coconut milk
- 60 g natural peanut butter
- 30 ml honey or maple syrup
- 5 ml vanilla extract
- 1.25 ml salt
For the Peanut Butter Caramel:
- 120 g natural peanut butter
- 30 ml honey or maple syrup
- 0.5 ml salt
- 45 ml full-fat coconut milk
For the Topping:
- Roasted peanuts (about 1/4 cup)
For the Chocolate Coating:
- 170–255 g dark or semi-sweet chocolate
- 5–10 ml coconut oil
(Tip: You’ll find the full list of ingredients and measurements in the recipe card below.)
Directions
1. Prepare the Ice Cream Base
In a blender, combine the coconut milk, peanut butter, honey (or maple syrup), vanilla extract, and salt. Blend until smooth and creamy.
2. Freeze the Ice Cream Base
Pour the mixture into a parchment-lined 8×5 cm loaf pan and smooth the top. Freeze the pan for several hours, or until the ice cream base is firm to the touch.
3. Make the Peanut Butter Caramel
In a bowl, whisk together the peanut butter, honey (or maple syrup), salt, and coconut milk until you have a cohesive caramel mixture. This will create the rich, creamy layer that’s similar to the caramel in a Snickers bar.
4. Layer the Caramel
Spread the peanut butter caramel evenly over the frozen ice cream base. Scatter roasted peanuts on top, gently pressing them into the caramel layer for a satisfying crunch. Return the pan to the freezer for several more hours, or until the layers are fully set.
5. Cut into Bars
Once the ice cream and caramel are fully frozen, remove the pan from the freezer. Lift the frozen slab out of the pan and use a sharp knife to cut it into 8 equal-sized bars. For clean slices, heat the knife under warm water and wipe it between cuts.
6. Prepare the Chocolate Coating
Melt the dark or semi-sweet chocolate with coconut oil over a water bath, or microwave in short intervals, stirring until smooth and fully melted.
7. Coat the Bars
Dip each bar into the melted chocolate, ensuring it’s completely coated. Place each coated bar onto a parchment-lined tray.
8. Freeze to Set
Return the bars to the freezer and allow them to freeze until the chocolate coating has fully set (about 15–20 minutes).
9. Serve
Allow the bars to sit at room temperature for 3–5 minutes before serving to get the ideal texture. The ice cream will soften slightly, making them easier to bite into.
10. Store
Store any leftover bars in an airtight container in the freezer for up to 2 weeks.
Servings and Timing
- Servings: 8 bars
- Prep Time: 30 minutes
- Total Time: 30 minutes (plus freezing time)
Variations
- Different Nuts: Swap the roasted peanuts with other nuts such as almonds or cashews for a different flavor and texture.
- Add Chocolate Chips: Mix some mini chocolate chips into the ice cream base for an extra chocolatey surprise in every bite.
- Sweetener Options: Use maple syrup or agave nectar in place of honey to suit your preference for a vegan option.
Storage/Reheating
- Storage: Store the bars in an airtight container in the freezer for up to 2 weeks.
- Freezing: You can freeze the bars as soon as they’re coated in chocolate. They freeze well and will keep their shape and flavor for an extended period.
- Reheating: These bars don’t need reheating—simply let them soften slightly at room temperature before serving for the best texture.
FAQs
Can I use a different nut butter for the caramel?
Yes! You can substitute peanut butter with almond butter, cashew butter, or any other nut butter you prefer. Just keep in mind that the flavor will change slightly depending on the nut butter used.
Can I make these bars ahead of time?
Yes! These bars are perfect for making ahead of time. Just store them in the freezer, and they’ll stay fresh and ready to enjoy whenever you need a sweet treat.
Can I use milk chocolate instead of dark chocolate?
Absolutely! Milk chocolate will give the bars a sweeter, creamier taste, while dark chocolate provides a richer, less sweet contrast. Use whichever type of chocolate you prefer.
How do I prevent the chocolate from cracking when dipping?
Make sure the ice cream bars are completely frozen before dipping them in chocolate. This will help the chocolate adhere smoothly without cracking. If the chocolate thickens too much while coating, warm it up slightly to maintain a smooth consistency.
Conclusion
These Homemade Snickers Ice Cream Bars are a must-try frozen treat for anyone who loves a combination of creamy peanut butter, rich caramel, and a crisp chocolate coating. Easy to make and so much more satisfying than store-bought versions, these bars are perfect for cooling off in the summer or indulging in any time of year. With their sweet and savory layers, they’re sure to become a favorite treat in your household!
Homemade Snickers Ice Cream Bars
These Homemade Snickers Ice Cream Bars combine creamy peanut butter ice cream, rich caramel, roasted peanuts, and a chocolate coating for a decadent dessert. Dairy-free and gluten-free, they’re perfect for anyone with dietary restrictions but loved by everyone.
- Prep Time: 30 minutes
- Cook Time: 0 minutes
- Total Time: 30 minutes (plus freezing time)
- Yield: 8 bars
- Category: Dessert
- Method: Frozen
- Cuisine: American
Ingredients
200 g full-fat canned coconut milk
60 g natural peanut butter
30 ml honey or maple syrup
5 ml vanilla extract
1.25 ml salt
120 g natural peanut butter
30 ml honey or maple syrup
0.5 ml salt
45 ml full-fat coconut milk
Roasted peanuts (about 1/4 cup)
170–255 g dark or semi-sweet chocolate
5–10 ml coconut oil
Instructions
- Prepare the Ice Cream Base: In a blender, combine the coconut milk, peanut butter, honey (or maple syrup), vanilla extract, and salt. Blend until smooth and creamy.
- Freeze the Ice Cream Base: Pour the mixture into a parchment-lined 8×5 cm loaf pan and smooth the top. Freeze for several hours until firm to the touch.
- Make the Peanut Butter Caramel: Whisk together the peanut butter, honey (or maple syrup), salt, and coconut milk until smooth and creamy.
- Layer the Caramel: Spread the caramel over the frozen ice cream base. Sprinkle roasted peanuts on top, pressing gently into the caramel layer. Freeze until set.
- Cut into Bars: Once the layers are fully frozen, cut into 8 equal bars using a sharp knife.
- Prepare the Chocolate Coating: Melt the chocolate and coconut oil over a water bath or microwave. Stir until smooth.
- Coat the Bars: Dip each bar into the melted chocolate, fully coating it, then place on a parchment-lined tray.
- Freeze to Set: Freeze the bars until the chocolate coating sets, about 15–20 minutes.
- Serve: Allow the bars to sit at room temperature for 3–5 minutes before serving for the best texture.
- Store: Store in an airtight container in the freezer for up to 2 weeks.
Notes
Use maple syrup or agave nectar in place of honey for a vegan option.
For an extra chocolatey surprise, mix mini chocolate chips into the ice cream base.
Substitute peanut butter with almond or cashew butter for a different flavor.
Nutrition
- Serving Size: 1 bar
- Calories: 350
- Sugar: 30g
- Sodium: 45mg
- Fat: 22g
- Saturated Fat: 6g
- Unsaturated Fat: 15g
- Trans Fat: 0g
- Carbohydrates: 36g
- Fiber: 3g
- Protein: 6g
- Cholesterol: 0mg


