I love how these cake pops turn a simple vanilla cake into something playful and impressive. The cake is soft and buttery, and when I mix it with cream cheese frosting, it creates a rich, truffle-like texture that holds its shape beautifully.
I also appreciate how customizable they are. I can make each bunny look slightly different, giving them personality with tiny details. They are perfect for Easter gatherings, spring parties, or as a sweet homemade gift. I find that both kids and adults get excited when they see a tray full of these adorable treats.
Ingredients
(Note: All ingredient amounts are listed in the recipe card below.)
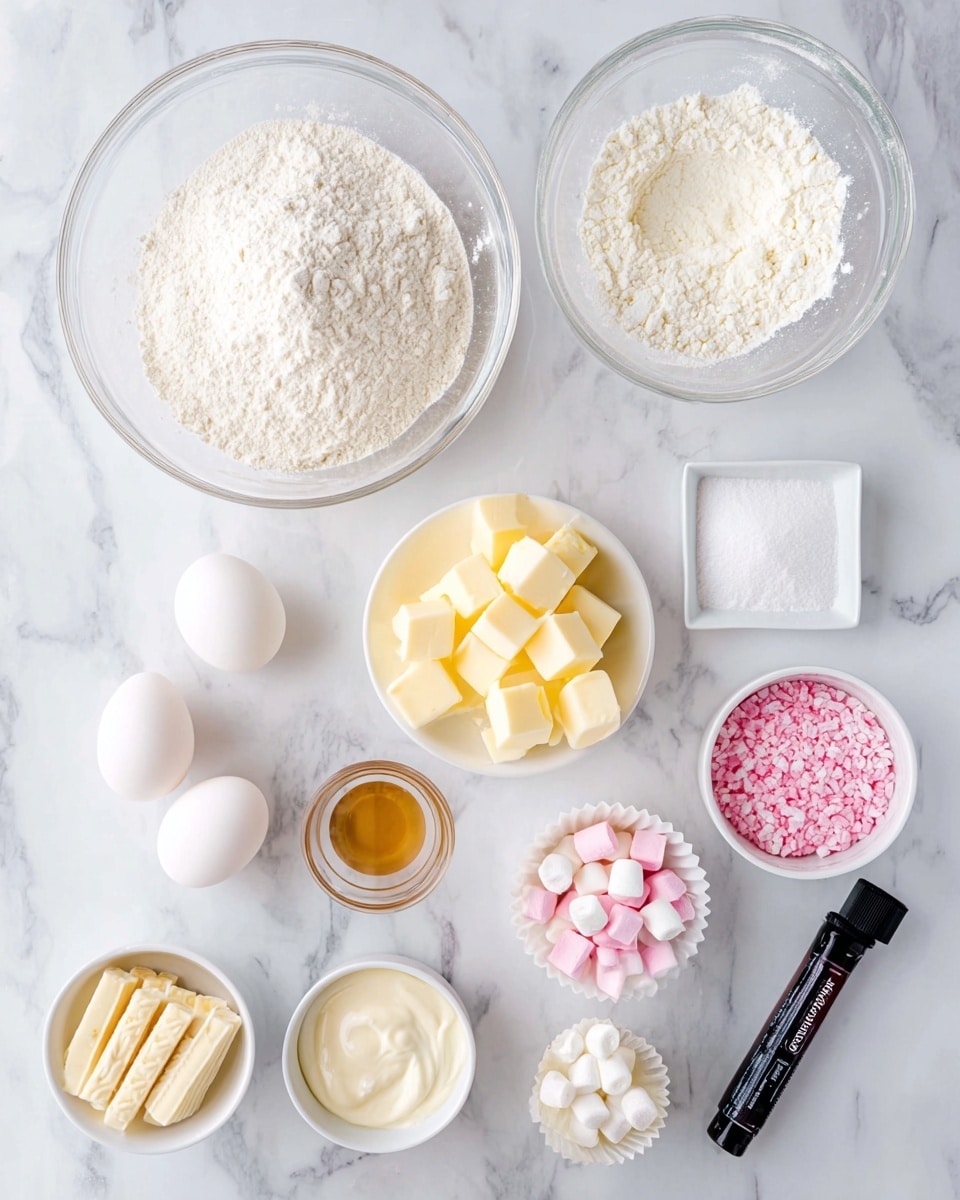
½ cup unsalted butter room temperature ¾ cup granulated sugar 2 large eggs 2 teaspoons vanilla extract 1 cup all-purpose flour 1 teaspoon baking powder ½ teaspoon salt ¼ cup whipped cream cheese frosting more if needed 14 ounces white candy melts pink sanding sugar pink and white mini marshmallows black edible food marker
Directions
I start by preheating the oven to 350 degrees and preparing an 8-inch round cake pan with parchment paper.
In a stand mixer fitted with the paddle attachment, I beat the butter for about 15 seconds until smooth. Then I add the sugar and beat at medium speed for 5 minutes until the mixture turns light yellow and fluffy.
I add the vanilla extract and eggs one at a time, mixing on low speed until combined. In a separate medium bowl, I whisk together the flour, baking powder, and salt. Slowly, I add the dry ingredients to the wet ingredients and mix just until combined.
I transfer the batter to the prepared cake pan and bake for 25 minutes, or until a toothpick inserted into the center comes out clean and the cake is golden. I let the cake cool for about 40 minutes before turning it into cake pops.
Once cooled, I crumble the cake into a large bowl using my hands or a food processor. I add the whipped cream cheese frosting and mix until the crumbs come together into a dough-like consistency with no dry bits visible.
Using a medium cookie scoop, I portion the mixture and roll it into smooth balls. To create bunny ears, I take a small amount of mixture, roll it into a sausage shape, and mold it into an ear. I gently attach two ears to each cake ball, shaping them carefully with my fingers. I place the shaped bunnies into a container and chill them in the freezer for 15 minutes.
In a small, deep microwave-safe container, I melt the white candy melts in 20-second intervals, stirring between each until smooth.
After chilling, I transfer the cake pops to the refrigerator. I work with one at a time, keeping the rest chilled. I dip a lollipop stick into the melted candy and insert it into the base of the bunny. Then I dip the entire pop into the melted candy, ears first, until fully coated. I let the excess drip off and place the stick into a foam block to set. I repeat with the remaining cake pops, reheating the candy melts as needed.
Once the coating has set, I add the decorative details. I use melted candy and a piping bag or cocktail stick to draw lines in the ears and immediately dust them with pink sanding sugar. I pipe small feet at the bottom and add sanding sugar to the paws.
With the edible food marker, I draw the eyes. I cut a small bunny nose from a pink mini marshmallow using kitchen shears or a knife and attach it with a bit of melted candy. I draw the mouth with the marker. Finally, I attach a white mini marshmallow to the lower back for the tail, coating it lightly with melted candy and texturing it with a cocktail stick to create a furry look. I let the cake pops set completely before serving.
Servings and Timing
I get 15 cake pops from this recipe.
Prep Time: 1 hour 5 minutes Cook Time: 25 minutes Set Time: 30 minutes Total Time: 2 hours
Each cake pop contains approximately 216 calories.
Variations
I sometimes use chocolate cake instead of vanilla for a richer flavor base. I can also swap the white candy melts for pastel-colored melts to create different bunny looks.
If I want extra flavor, I mix a little almond extract into the cake batter. For a coconut twist, I sprinkle finely shredded coconut onto the tails before the coating sets. I also like experimenting with different facial expressions using the edible marker to give each bunny its own personality.
Storage/Reheating
I store the finished cake pops in an airtight container in the refrigerator for up to 5 days. I let them sit at room temperature for about 20 minutes before serving so the texture softens slightly.
If I need to store them longer, I freeze them in a single layer until firm, then transfer them to a freezer-safe container. I thaw them overnight in the refrigerator before serving. I do not recommend reheating, as the candy coating can melt or lose its finish.
FAQs
How do I keep the cake pops from cracking?
I make sure the cake balls are not too cold when dipping and that the melted candy is not too hot. A drastic temperature difference can cause cracks.
Why are my cake pops falling off the stick?
I always dip the stick into melted candy before inserting it into the cake ball. This helps secure it in place once set.
Can I make these ahead of time?
I often make them a day or two in advance and store them in the refrigerator until ready to serve.
Can I use store-bought cake?
I can use store-bought cake in a pinch, but I prefer homemade for better texture and flavor control.
What if my mixture is too dry?
If the cake mixture seems crumbly, I add a little more cream cheese frosting until it holds together smoothly.
Can I use a different frosting?
I sometimes use vanilla buttercream instead of cream cheese frosting, though the texture may be slightly sweeter and firmer.
How do I melt candy melts smoothly?
I melt them in short intervals in the microwave, stirring often. I avoid overheating, which can cause them to seize.
Can I color the candy melts?
I use oil-based food coloring if I want to tint white candy melts, since water-based colors can cause them to clump.
How do I transport cake pops safely?
I place them in a sturdy cake pop stand or a box with small holes to keep them upright during transport.
Can I make them without ears?
If I want a simpler design, I shape them into round pops and decorate them as bunny faces without sculpted ears.
Conclusion
I love how these Bunny Cake Pops combine creativity and delicious flavor in one charming treat. The soft vanilla cake, creamy frosting, and sweet candy coating come together in a dessert that feels just as special as it looks. Whenever I make them, they quickly become the centerpiece of the dessert table and bring a little extra joy to any spring celebration.
Festive Easter Bunny Cake Pops made with moist homemade vanilla cake blended with cream cheese frosting, shaped into adorable bunnies, coated in white candy melts, and decorated with sweet spring details.
Author:Amy
Prep Time:1 hour 5 minutes
Cook Time:25 minutes
Total Time:2 hours
Yield:15 cake pops
Category:Dessert
Method:Baking
Cuisine:American
Diet:Vegetarian
Ingredients
½ cup unsalted butter, room temperature
¾ cup granulated sugar
2 large eggs
2 teaspoons vanilla extract
1 cup all-purpose flour
1 teaspoon baking powder
½ teaspoon salt
¼ cup whipped cream cheese frosting (more if needed)
14 ounces white candy melts
Pink sanding sugar
Pink mini marshmallows
White mini marshmallows
Black edible food marker
Instructions
Preheat oven to 350°F (175°C) and line an 8-inch round cake pan with parchment paper.
Beat butter in a stand mixer for 15 seconds until smooth. Add sugar and beat on medium speed for 5 minutes until light and fluffy.
Add vanilla extract and eggs one at a time, mixing on low speed until combined.
In a separate bowl, whisk together flour, baking powder, and salt. Gradually add dry ingredients to wet ingredients and mix just until combined.
Transfer batter to prepared pan and bake for 25 minutes, or until a toothpick inserted in the center comes out clean. Cool for 40 minutes.
Crumble cooled cake into a large bowl. Add cream cheese frosting and mix until a dough-like consistency forms with no dry crumbs.
Scoop and roll mixture into balls. Shape small pieces into ears and attach two ears to each ball, smoothing gently. Freeze for 15 minutes.
Melt white candy melts in a microwave-safe container in 20-second intervals, stirring until smooth.
Dip a lollipop stick into melted candy and insert into each bunny base. Dip entire cake pop into melted candy, coating fully. Let excess drip off and place upright in a foam block to set.
Once set, decorate ears with melted candy and pink sanding sugar. Add feet details with candy melts and sanding sugar.
Draw eyes and mouth with edible marker. Cut a small pink marshmallow for the nose and attach with melted candy. Attach a white marshmallow tail and texture lightly. Let set completely before serving.
Notes
Ensure cake pops are not too cold when dipping to prevent cracking.
Dip sticks in melted candy before inserting to secure them.
Add extra frosting if mixture feels too dry.
Use oil-based food coloring to tint candy melts.
Store in refrigerator up to 5 days or freeze for longer storage.
Let cake pops sit at room temperature 20 minutes before serving for best texture.


