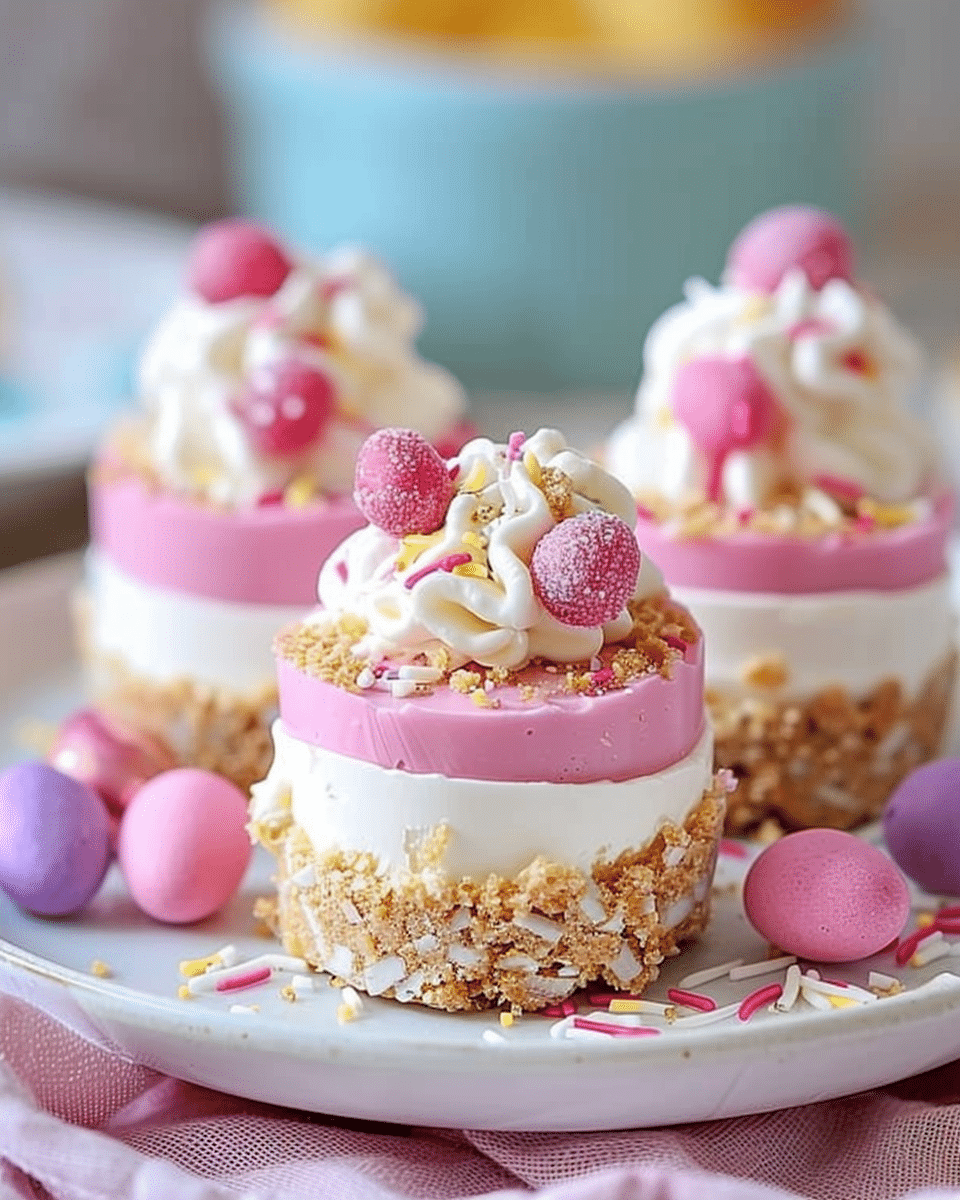
Why You’ll Love This Recipe
- No Baking Required: A simple, fuss-free dessert that sets in the refrigerator.
- Perfectly Creamy: A light and airy cheesecake texture with a rich, buttery crust.
- Festive & Fun: Pastel-colored chocolate, Easter sprinkles, and mini candy eggs make them a holiday favorite.
- Make-Ahead Friendly: Ideal for prepping in advance for Easter gatherings.
Ingredients
For the Crust:
- 1 1/2 cups graham cracker crumbs
- 1/4 cup unsalted butter, melted
- 2 tablespoons sugar
For the Cheesecake Filling:
- 8 oz cream cheese, softened
- 1/2 cup powdered sugar
- 1 teaspoon vanilla extract
- 1 cup heavy whipping cream
For the Topping:
- 1/2 cup white chocolate, melted
- Pink food coloring (or any pastel color of choice)
- Easter sprinkles
- Mini candy eggs (like Cadbury Mini Eggs or M&M’s Eggs)
(Tip: You’ll find the full list of ingredients and measurements in the recipe card below.)
Directions
Step 1: Prepare the Crust
- In a medium bowl, mix the graham cracker crumbs, melted butter, and sugar until combined.
- Divide the mixture evenly among 12 mini cheesecake molds or muffin liners, pressing it down firmly with the back of a spoon.
- Place in the refrigerator while preparing the filling.
Step 2: Make the Cheesecake Filling
- In a large bowl, beat the softened cream cheese, powdered sugar, and vanilla extract until smooth and creamy.
- In a separate bowl, whip the heavy cream until stiff peaks form (about 2-3 minutes).
- Gently fold the whipped cream into the cream cheese mixture, making sure not to deflate it.
- Spoon or pipe the cheesecake filling over the chilled crusts, smoothing the tops.
Step 3: Add the Topping
- Melt the white chocolate in the microwave in 30-second intervals, stirring after each interval until smooth.
- Add a few drops of pink food coloring (or any pastel shade of choice) and stir until evenly colored.
- Spread a thin layer of the melted chocolate over each cheesecake.
Step 4: Decorate & Chill
- Sprinkle each cheesecake with Easter sprinkles and top with mini candy eggs for a festive touch.
- Refrigerate for at least 2 hours (or overnight for best results) before serving.
Step 5: Serve & Enjoy!
Gently remove the cheesecakes from the molds and serve chilled.
Servings and Timing
- Servings: 12 mini cheesecakes
- Prep Time: 20 minutes
- Chill Time: 2 hours
- Total Time: 2 hours 20 minutes
Variations
- Chocolate Crust: Swap graham crackers for crushed chocolate cookies or vanilla wafers.
- Rainbow Colors: Use different pastel food colors to create a multicolored effect.
- Gluten-Free Option: Use gluten-free graham crackers for a gluten-free version.
- Citrus Twist: Add a teaspoon of lemon or orange zest for a fresh, tangy flavor.
Storage/Reheating
- Storage: Keep cheesecakes in an airtight container in the refrigerator for up to 3 days.
- Freezing: Freeze for up to 1 month in an airtight container. Thaw in the fridge before serving.
FAQs
1. Can I make these ahead of time?
Yes! These mini cheesecakes can be made a day in advance and stored in the fridge until ready to serve.
2. Can I use a different type of cookie for the crust?
Absolutely! Crushed Oreos, vanilla wafers, or digestive biscuits all work well.
3. Can I make these cheesecakes without heavy whipping cream?
You can substitute whipped topping (like Cool Whip) if needed, but fresh whipped cream gives the best texture.
4. What if I don’t have a silicone mold?
Use muffin liners in a standard muffin tin for easy removal.
5. Can I use dark or milk chocolate instead of white chocolate?
Yes! Just adjust the food coloring accordingly for a pastel effect.
6. How do I get my cheesecakes to set properly?
Make sure to refrigerate them for at least 2 hours (overnight is even better).
7. Can I use gel food coloring instead of liquid?
Yes, gel food coloring works well and gives a more vibrant color.
8. What toppings can I use besides mini candy eggs?
Try shredded coconut, fresh berries, or crushed nuts for variety.
9. How do I get a smooth cheesecake filling?
Ensure your cream cheese is fully softened before mixing to avoid lumps.
10. Can I make a large no-bake cheesecake instead of mini ones?
Yes! Use an 8-inch springform pan and increase the chill time to 4+ hours.
Conclusion
These Easter No-Bake Mini Cheesecakes are the perfect festive dessert for spring. Easy to make and fun to decorate, they’re sure to be a hit at any Easter gathering. With a buttery graham cracker crust, creamy cheesecake filling, and colorful toppings, they’re as delicious as they are adorable!
Easter No-Bake Mini Cheesecakes Recipe
Celebrate Easter with these No-Bake Mini Cheesecakes! Featuring a buttery graham cracker crust, a creamy vanilla cheesecake filling, and a festive pastel chocolate topping, these adorable treats are perfect for spring. No baking required, making them an easy and fun dessert for your Easter celebration!
- Prep Time: 20 minutes
- Total Time: 2 hours 20 minutes
- Yield: 12 mini cheesecakes
- Category: Dessert / No-Bake
- Method: No-Bake / Chilled
- Cuisine: American
- Diet: Vegetarian
Ingredients
For the Crust:
- 1 ½ cups graham cracker crumbs
- ¼ cup unsalted butter, melted
- 2 tablespoons sugar
For the Cheesecake Filling:
- 8 oz cream cheese, softened
- ½ cup powdered sugar
- 1 teaspoon vanilla extract
- 1 cup heavy whipping cream
For the Topping:
- ½ cup white chocolate, melted
- Pink food coloring (or any pastel color of choice)
- Easter sprinkles
- Mini candy eggs (Cadbury Mini Eggs or M&M’s Eggs)
Instructions
1️⃣ Prepare the Crust:
- In a medium bowl, mix the graham cracker crumbs, melted butter, and sugar until combined.
- Divide the mixture evenly into 12 mini cheesecake molds or muffin liners.
- Press down firmly with the back of a spoon and chill in the refrigerator while preparing the filling.
2️⃣ Make the Cheesecake Filling:
- In a large bowl, beat the cream cheese, powdered sugar, and vanilla extract until smooth.
- In a separate bowl, whip the heavy cream until stiff peaks form (about 2-3 minutes).
- Gently fold the whipped cream into the cream cheese mixture until smooth.
- Spoon or pipe the cheesecake filling over the chilled crusts, smoothing the tops.
3️⃣ Add the Topping:
- Melt the white chocolate in the microwave in 30-second intervals, stirring after each interval.
- Add a few drops of pink food coloring (or pastel shade of choice) and stir until evenly colored.
- Spread a thin layer of the melted chocolate over each cheesecake.
4️⃣ Decorate & Chill:
- Sprinkle each cheesecake with Easter sprinkles and top with mini candy eggs.
- Refrigerate for at least 2 hours (overnight for best results).
5️⃣ Serve & Enjoy!
- Carefully remove from molds and serve chilled.
Notes
- Chocolate Crust: Swap graham crackers for crushed Oreos or vanilla wafers.
- Rainbow Colors: Use different pastel food colors for a multicolored effect.
- Gluten-Free Option: Use gluten-free graham crackers for a gluten-free version.
- Citrus Twist: Add lemon or orange zest for a fresh, tangy flavor.


