I love this recipe because it’s easy to follow yet gives professional-quality results. The texture is soft and spongy on the inside and lightly crisp on the outside, ideal for soaking up coffee or liqueur in layered desserts. I also enjoy making them because they use just a few simple pantry ingredients and come together quickly, making them a wonderful homemade touch for any dessert.
Ingredients
(Note: All ingredient amounts are listed in the recipe card below.)
70 grams egg whites (about 2 large eggs) 45 grams egg yolks (about 2 large eggs) 62 grams white sugar, plus more for sprinkling on top 62 grams all-purpose flour 1 pinch salt Powdered sugar, for dusting on top of ladyfingers
Directions
Step 1 I preheat my oven to 390°F (200°C) and line two baking sheets with parchment paper.
Step 2 I separate the eggs, placing the whites in one bowl and the yolks in another. I make sure both are at room temperature so they whip properly.
Step 3 I add the granulated sugar and a pinch of salt to the egg whites, then whip them using an electric mixer on medium speed. I continue whisking until the whites form a very firm, shiny meringue that holds its shape well—this is key for light and structured ladyfingers.
Step 4 In a separate bowl, I beat the egg yolks with a fork until smooth and slightly pale. Then I gently fold the yolks into the meringue using a spatula, mixing slowly so the airy texture isn’t lost.
Step 5 I sift the flour into the mixture in two or three batches, folding it in carefully with the spatula. I stop as soon as the batter looks smooth, thick, and fluffy.
Step 6 I transfer the batter into a piping bag fitted with a round tip (about 13 mm in diameter). I pipe long strips—each around 8 cm long and just over 1 cm thick—onto the lined baking sheets, leaving space between them so they don’t touch as they expand in the oven.
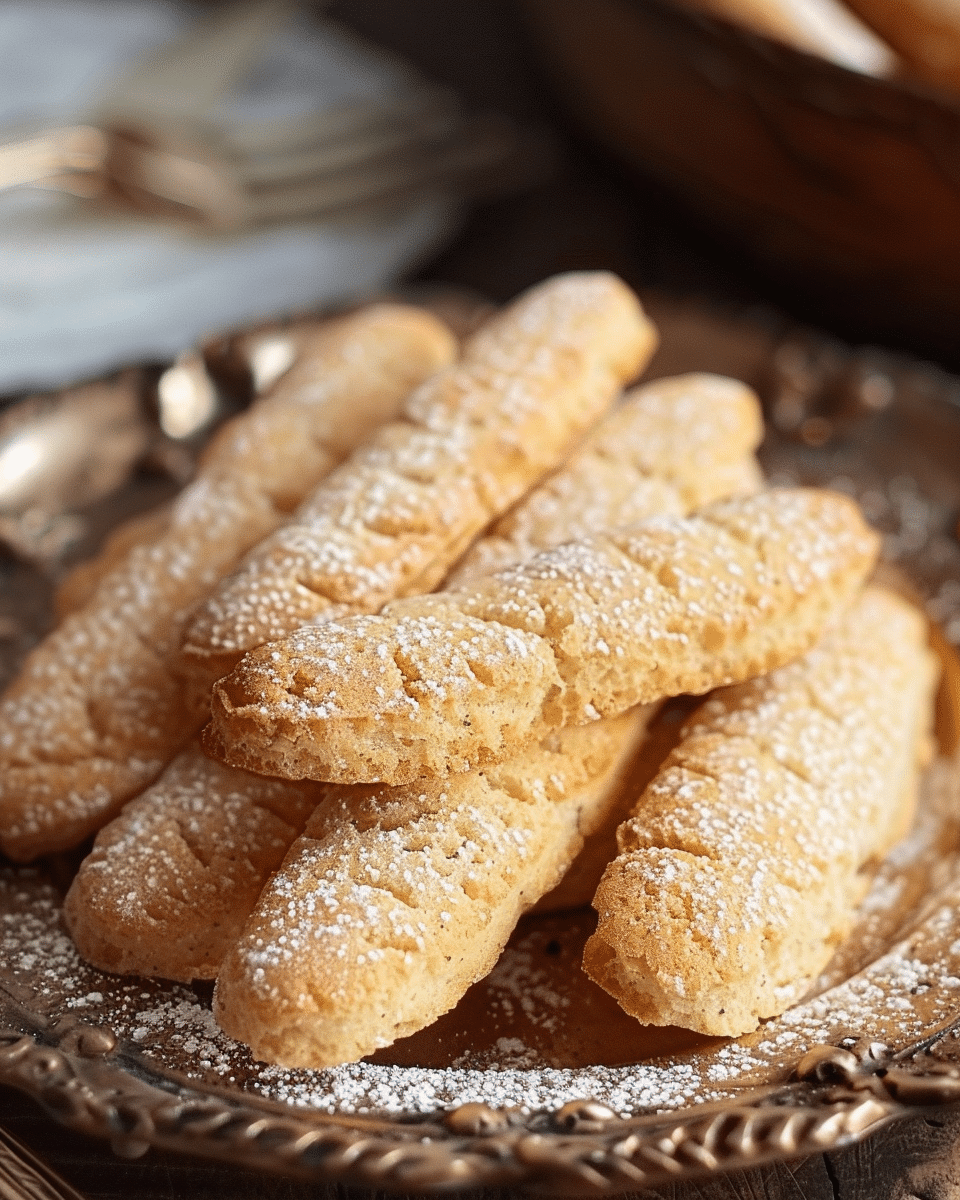
Step 7 I sprinkle the piped cookies first with granulated sugar, then with a light dusting of powdered sugar using a fine sifter. This helps create their characteristic crisp top.
Step 8 I bake the ladyfingers on the middle rack for 5 minutes, then slightly open the oven door to let out steam and continue baking for another 2 minutes, until they are golden and firm to the touch.
Step 9 Once baked, I lift the parchment with the cookies still on it and place it on a flat surface or cooling rack. I let the ladyfingers cool completely before handling.
Step 10 If I plan to serve them on their own, I dust them again with a bit of powdered sugar for extra sweetness and presentation.
Servings and Timing
This recipe makes about 25 ladyfingers and takes around 42 minutes total—35 minutes of prep time and 7 minutes of baking. It’s a great recipe to make ahead for desserts like tiramisu or trifle, as the cookies can be stored easily.
Variations
Sometimes I add a few drops of vanilla extract or lemon zest to the batter for a subtle twist in flavor. For chocolate ladyfingers, I replace a tablespoon of flour with cocoa powder. I can also make them gluten-free by substituting the all-purpose flour with a gluten-free flour blend.
Storage/Reheating
I store the cooled ladyfingers in an airtight container at room temperature for up to 5 days. For longer storage, I freeze them in a sealed bag for up to a month and let them come to room temperature before using. They don’t need reheating, but if I want them crisp again, I pop them in a 300°F (150°C) oven for a few minutes.
FAQs
Can I make ladyfingers without a piping bag?
Yes, I spoon the batter into a plastic bag, cut off one corner, and pipe it that way—it works perfectly.
How do I keep them from deflating?
I make sure to fold the ingredients gently and bake them right after piping so the air doesn’t escape.
Can I make these gluten-free?
Yes, I replace the flour with a good-quality gluten-free blend, and they turn out beautifully.
Can I flavor them?
Absolutely. I sometimes add vanilla, almond, or lemon zest for a subtle flavor boost.
How do I make them crisper?
I bake them for an extra minute or two, but I watch them closely so they don’t brown too much.
Are they supposed to be soft or crunchy?
They should be crisp on the outside and slightly soft inside, perfect for soaking up liquid in desserts.
Can I use them for tiramisu right away?
Yes, but I prefer letting them cool completely first so they hold up better when soaked.
Can I store them in the fridge?
I don’t recommend it—moisture from the fridge makes them soft. Room temperature storage is best.
Can I double the recipe?
Yes, I often double it when making tiramisu for a crowd. Just bake in batches for even results.
Why are my ladyfingers flat?
That usually happens if the egg whites weren’t whipped enough or if the batter was overmixed.
Conclusion
Homemade ladyfingers are one of those classic recipes that make me feel like a true Italian baker. I love their lightness, their golden color, and how versatile they are in all kinds of desserts. Whether I use them for a rich tiramisu or simply enjoy them dusted with sugar and coffee, these delicate cookies always bring a touch of elegance and nostalgia to my table.
Light, airy, and delicately crisp homemade ladyfingers—perfect for tiramisu, trifles, charlottes, or enjoying on their own. These sponge-like Italian cookies are far superior to store-bought and incredibly easy to make.
Author:Amy
Prep Time:35 minutes
Cook Time:7 minutes
Total Time:42 minutes
Yield:25 ladyfingers
Category:Dessert
Method:Baking
Cuisine:Italian
Diet:Vegetarian
Ingredients
70 g egg whites (about 2 large eggs)
45 g egg yolks (about 2 large eggs)
62 g white sugar, plus extra for sprinkling
62 g all-purpose flour
1 pinch salt
Powdered sugar, for dusting
Instructions
Preheat oven to 390°F (200°C). Line two baking sheets with parchment paper.
Separate egg whites and yolks. Ensure both are at room temperature.
Whip egg whites with sugar and salt until a very firm, shiny meringue forms.
Beat yolks lightly, then gently fold them into the meringue.
Sift flour in 2–3 batches and fold gently until smooth and fluffy.
Transfer batter to a piping bag with a round 13 mm tip. Pipe 8 cm long strips, spaced apart.
Sprinkle piped batter with granulated sugar, then a light dusting of powdered sugar.
Bake 5 minutes, open the oven door slightly to release steam, and bake 2 more minutes until golden.
Slide parchment with cookies onto a rack and cool completely.
If serving plain, dust with powdered sugar before serving.
Notes
Add vanilla extract or lemon zest for extra flavor.
Replace 1 tbsp flour with cocoa powder for chocolate ladyfingers.


